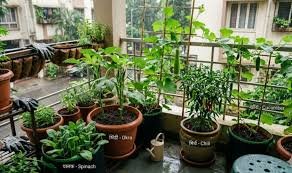
There is something undeniably special about walking over to your balcony, snipping a handful of fresh, aromatic greens, and tossing them straight into your morning methi paratha dough or evening aloo methi sabzi. If you have ever wanted to start your own little kitchen garden but felt intimidated by complicated fertilizing schedules or delicate plants, we have great news for you.
Meet Methi (Fenugreek)—the undisputed king of beginner-friendly Indian greens.
Learning how to grow methi in pots at home in India is perhaps the quickest, easiest, and most rewarding gardening project you can take up. You don’t need a massive backyard, expensive greenhouse equipment, or an advanced green thumb. In fact, you don’t even need to buy fancy seeds from a nursery!
With just a simple shallow plastic crate or container, a bit of soil, and a quick trip to your kitchen pantry, you can harvest a lush crop of crisp, organic fenugreek greens in just 20 days.
Let’s look into a simple, step-by-step roadmap to successfully cultivating your own chemical-free leafy vegetables right on your windowsill or balcony.
🍃 Why Methi is the Absolute Best Green for Indian Home Gardeners
If you are a complete novice to urban farming, fenugreek is your perfect starting point. Here is why it belongs in every Indian home container garden:
- Micro-Lightning Fast Growth: Unlike tomatoes or chillies that keep you waiting for months, methi sprouts in 3 days and hits harvest size in under three weeks.
- Forgiving Nature: It isn’t a fussy plant. It grows beautifully in partial sunlight and tolerates minor watering mistakes like a absolute champ.
- Zero Budget Required: The startup cost is practically zero since you can reuse household containers and standard kitchen grocery supplies.
- Pest Resistance: The natural aromatic compounds present in fenugreek leaves act as a mild deterrent to many common garden bugs.
🍂 Best Season for Growing Methi in India
While you can technically grow fenugreek year-round in many parts of the country with proper shade management, the plant fundamentally loves a mild, cool climate.
❄️ The Golden Window: Winter (October to February)
This is the absolute peak season for leafy greens across India. The cool breeze and pleasant daytime sun help the seeds grow into incredibly tender, large, and richly fragrant leaves.
🌧️ The Secondary Window: Monsoon (July to September)
You can successfully raise container-grown greens during the rainy season, provided your pots have flawless drainage. Excessive standing water can lead to root rot.
☀️ The Summer Strategy (March to June)
Fenugreek can struggle in the scorching, dry summer heat of central and northern India. If you are growing it during these hot months, place your pots in a semi-shaded spot that receives morning light but stays protected from the harsh afternoon sun.
🌾 Can You Use Standard Kitchen Methi Seeds?
One of the most common questions beginner gardeners ask is: “Do I need to buy high-yield hybrid seeds from an online nursery?”
The wonderful answer is no! The regular, whole fenugreek seeds sitting in your kitchen masala dabba work exceptionally well. They are viable, organic, and ready to sprout.
The Soaking Secret for Faster Sprouting
While you can sow them directly dry, soaking your kitchen seeds in a cup of plain water for 8 to 12 hours (overnight) gives them a massive head start. Soaking softens the hard outer seed coat, signaling the plant embryo inside to wake up. This simple step slashes your germination time from five days down to less than 48 hours!
📐 Choosing the Perfect Pot Size: Why Shallow Trays Rule
When people think of growing vegetables, they often picture deep, heavy clay pots. But methi has a very shallow, delicate fibrous root system. It doesn’t grow deep; it spreads wide.
- The Ideal Choice: Opt for broad, shallow containers like plastic seed-growing trays, rectangular window boxes, broken plastic washing tubs, or even a discarded fruit crate lined with a cement sack.
- The Dimensions: A depth of just 4 to 6 inches is perfect. Focus instead on maximizing surface area so you can scatter plenty of seeds.
- Drainage is Vital: Ensure your chosen container has at least 3–4 proper drainage holes at the bottom. If water stagnates in the bottom soil layer, your delicate seedlings will rot and collapse overnight.
🪱 Crafting the Ideal Soil Mix & Seed Density
To get a lush, dense carpet of green leaves, your soil needs to be loose, light, and rich in nitrogen (which promotes leafy growth).
The Perfect Potting Soil Recipe
Mix equal parts of these three easily available components:
- 33% Regular Garden Soil: Provides a stable mineral base.
- 33% Compost (Vermi-compost or well-rotted Cow Dung manure): Delivers the organic nutrients needed for rapid vegetative growth.
- 33% Coco Peat: Holds light moisture without becoming heavy or muddy, allowing the tiny roots to spread effortlessly.
Step-by-Step Sowing Technique
[Step 1: Fill Pot]      -> Leave a 1-inch gap at the top of your shallow tray.
       |
[Step 2: Scatter Seeds] -> Broadcast soaked seeds evenly across the surface (Not too close!).
       |
[Step 3: Cover Lightly] -> Sprinkle a thin 0.5-inch layer of coco peat or soil over them.
       |
[Step 4: Gentle Mist]   -> Spray water using a spray bottle so seeds don't wash away.
💡 Pro-Tip on Seed Density: Avoid piling seeds on top of each other in thick clumps. Space them out slightly so each sprout gets its own share of light and breathing room.
💧 The Smart Watering Schedule for Seedlings
Watering delicate seedlings requires a gentle touch. Pouring a heavy mug of water directly into the pot will wash away the topsoil layer, uncover the roots, and flatten the young stalks.
- Day 1 to Germination: Use a fine-mist spray bottle to keep the topsoil damp. The surface should look like a wrung-out sponge—dark and moist, but never muddy or pooling water.
- Post-Germination: Once the green shoots rise, switch to gently sprinkling water using your fingers or a watering can fitted with a fine rose spray rose head. Water only when the top half-inch of soil feels dry to the touch.
🗓️ The 20-Day Fenugreek Leaves Growth Timeline
What should you expect once your seeds are tucked into the soil? Here is a realistic daily breakdown of your container vegetable garden:
- Days 2–3 (The Awakening): You will spot tiny, pale-yellow loops breaking through the soil. Within 24 hours, they uncurl into two small, smooth, oval seed-leaves (cotyledons). Move the pot to a bright window or balcony that gets 3–4 hours of direct sunlight.
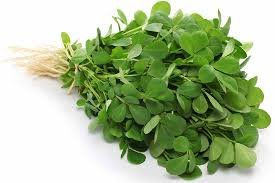
- Days 7–10 (The True Leaves): The plant begins to look like unmistakable fenugreek. The distinct, long-stemmed “true leaves” with their classic signature three-lobed shape will emerge from the center.
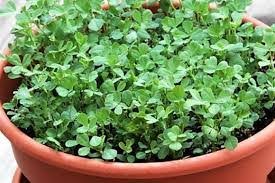
- Days 14–18 (The Growth Spurt): The stems thicken, and the foliage fills out into a dense, bright green canopy. The characteristic earthy, herbal fragrance of methi will become noticeable whenever you brush past the pot.
- Day 20 (Harvest Time!): Your plants will reach a height of roughly 5 to 6 inches. The stems are crisp, juicy, and the leaves are tender—perfect for picking.
✂️ First Harvest vs Repeat Harvest: Mastering the Cut
When it comes to harvesting your home-grown organic produce, you have two strategic choices depending on your culinary goals:
Method 1: The Pull-Out Method (One-Time Harvest)
If you love incredibly tender microgreens or baby methi (Chhoti Methi), simply hold a cluster of stalks gently and pull them out along with the roots. Rinse the roots thoroughly to remove soil particles, and use the entire plant in your cooking.
Method 2: The Cut-and-Come-Again Method (Repeat Harvests)
If you want to get multiple harvests from a single potting run, take a sharp pair of clean kitchen scissors. Snip the stems about 1 inch above the soil line, leaving the base leaves and roots intact.
Within 4 to 5 days, new shoots will sprout from the remaining nodes. Using this method, you can easily secure 2 to 3 successive harvests from the exact same container before the plant energy depletes!
🐛 Common Problems and How to Fix Them
Even though growing fenugreek is straightforward, you might occasionally run into a few common balcony gardening hurdles. Here is how to troubleshoot them naturally:
1. Leggy, Tall, and Floppy Seedlings
- The Symptom: Stems grow incredibly thin, long, and pale, eventually falling over under their own weight.
- The Cause: Lack of light. The plants are stretching their bodies upward in a desperate search for sunlight.
- The Fix: Move your container to a spot that receives more bright, direct sunlight daily.
2. Yellowing Leaves
- The Symptom: The vibrant green color fades out into a pale yellow.
- The Cause: Overwatering or poor drainage, which chokes the roots and starves them of oxygen.
- The Fix: Reduce your watering frequency immediately. Let the top layer of soil dry out completely before adding more moisture.
3. White Powdery Fungus (Powdery Mildew)
- The Symptom: A fine, flour-like white dusting appears across the leaves during humid spells.
- The Cause: High humidity combined with crowded planting and poor air circulation.
- The Fix: Snip away the worst affected leaves. Mix a teaspoon of organic baking soda with a liter of water and a drop of liquid dish soap, and spray it lightly on the remaining foliage.
🗺️ Regional Methi Growing Calendar for Indian Cities
To get the absolute best results, adapt your planting schedule to match your local urban climate:
| Urban Zone | Best Planting Months | Microclimate Care Tip |
| North India (Delhi, NCR, Lucknow, Chandigarh) | October to March | Enjoy peak growth during the crisp northern winter. Protect young sprouts from intense frost during late January by moving them indoors overnight. |
| West & East India (Mumbai, Kolkata) | August to February | High coastal humidity means you need to watch out for soil fungus. Ensure your soil mix contains extra sand or perlite for swift water drainage. |
| South India (Bengaluru, Hyderabad, Chennai) | Year-Round (Best Oct–Jan) | Bengaluru’s pleasant, stable weather is perfect for year-round cultivation. In hot Chennai, stick to shaded balconies during mid-summer. |
🙋♀️ Frequently Asked Questions (FAQs)
Q1. Do I need to apply chemical fertilizers to grow methi at home?
Ans: Not at all. Because fenugreek completes its entire growth cycle in just 20 to 25 days, the organic compost you mix into the initial potting soil provides more than enough nutrition. Keep it completely chemical-free for the healthiest home-cooked meals.
Q2. My methi plants started flowering. Are the leaves still edible?
Ans: Yes, they are still safe to eat, but once the plant transitions into its flowering and seed-bearing stage, the leaves tend to turn significantly more bitter and lose their tender texture. It is best to harvest them before flowers appear.
Q3. Can I grow fenugreek indoors on a kitchen counter?
Ans: You can grow them indoors only if your kitchen counter features a large windowsill that receives at least 3 hours of direct morning sunlight daily. If your indoor space is dark, the seeds will sprout but quickly become leggy and die off.
Q4. Why does my home-grown methi taste more bitter than commercial market variants?
Ans: Slight bitterness is a natural characteristic of fresh fenugreek. However, intense bitterness usually happens if the plants are underwatered or subjected to excessive heat stress. Keeping the soil consistently damp and harvesting early at day 20 keeps the flavor remarkably mild and sweet.
🌸 Conclusion
There is immense joy and satisfaction in cultivating your own clean, organic food. Growing a tray of fresh fenugreek leaves is a wonderful way to introduce children to nature, green up a compact urban apartment balcony, and elevate your daily Indian cooking with unmatched freshness.
All it takes is a spare shallow tub, a handful of seeds from your kitchen pantry, and 20 days of simple care.
See Also
How to Grow Methi (Fenugreek) At Home
How to Grow Coriander in Pots in India Without Bolting
The North Indian Winter Gardening Guide: What to Sow in October