There is something deeply satisfying about plucking a crisp, bright green chili straight from your balcony plant and chopping it right into a sizzling tadka. If you are an Indian foodie, you already know that our meals are practically incomplete without a kick of hari mirch. Whether it is a comforting bowl of dal chawal, a spicy street-style poha, or a hot plate of afternoon pakoras, green chillies are the unsung heroes of the Indian kitchen.
But let’s be honest for a second. Have you noticed how store-bought chillies from the local sabzi mandi sometimes feel a bit… dull? They sit in cold storage or open transport for days, losing their essential oils, moisture, and that signature nose-clearing pungency.
When you learn how to grow chillies in pots at home in India, you aren’t just growing a plant; you are cultivating pure flavor. Homegrown Indian chillies taste significantly hotter, crisper, and fresher than store-bought ones because they are packed with active capsaicin—the natural chemical compound that gives chillies their heat—undiluted by long supply chains.
If you’ve always wanted your own endless supply of fiery chillies but felt intimidated by gardening, don’t worry. Grab a cup of chai, and let’s dive into this complete guide to turning your sunny balcony or terrace into a chili haven.
The Big Debate: Kitchen Seeds vs. Hybrid Chili Varieties
Before you dig your hands into the dirt, you need to make a crucial decision: where are your seeds coming from? As a beginner looking into how to grow chillies in pots at home in India, you have two primary routes.
Option A: Sowing Seeds from Your Kitchen Spice Box
We’ve all done it—cracking open a dried red chili (sukhi lal mirch) from the spice jar and scattering the flaky white seeds into a random flowerpot.
- The Pros: It is absolutely free, incredibly convenient, and acts as a fun weekend experiment.
- The Cons: It’s a game of Russian roulette. Kitchen chillies are often commercial hybrids. The seeds they produce (second-generation seeds) may result in weak plants, low yields, or completely spice-less chillies. Furthermore, the drying process sometimes damages the seed embryo, leading to very low germination rates.
Option B: Buying Certified Hybrid Varieties (The Smart Choice)
If you want guaranteed results, high yields, and a plant that can fight off local diseases, investing a few rupees in certified seeds is the way to go.
For the absolute best results in Indian conditions, look for the Pusa Jwala variety. Developed by the Indian Agricultural Research Institute (IARI), Pusa Jwala is the undisputed king of home gardens. It is highly pungent, produces beautifully long, curved chillies, and boasts excellent resistance to common pests. Other great Indian open-pollinated varieties include Pant C-1 and Bhagya Lakshmi.
The Pot and Soil Formula for Growing Chillies in Containers
Your chili plant is going to live its whole life in a container, so you need to give it a spacious home and a nutrient-rich diet. If you just grab random mud from a local construction site or public park, your plant’s roots will suffocate, rot, and die.
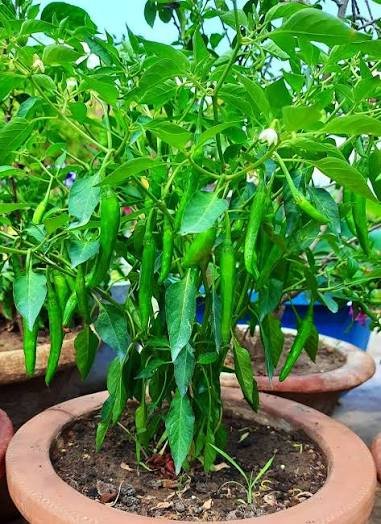
Selecting the Perfect Pot Size
Chillies love to spread their roots wide and deep.
- Minimum Size: You need a pot that is at least 10 to 12 inches in diameter and depth.
- Material: Terracotta or clay pots are the absolute best because they allow the soil to breathe and keep the roots cool during scorching Indian summers. However, high-quality plastic pots or lightweight fabric grow bags work perfectly fine too, provided they have ample drainage holes at the bottom.
The Ultimate 1:1:1 Potting Soil Mix
To master how to grow chillies in pots at home in India, you must replicate the loose, aerated, well-draining soil structures found in India’s top agricultural belts. Here is the foolproof recipe:
- 1 Part Regular Garden Soil: Provides the mineral structure and base.
- 1 Part Cocopeat: Holds essential moisture so your soil doesn’t turn into a brick under the harsh sun.
- 1 Part Organic Vermicompost or Aged Cow Dung Manure (Gobar Ki Khaad): Supplies a steady, slow-release stream of nitrogen, phosphorus, and potassium.
Pro-Tip for Indian Gardeners: Mix in two tablespoons of Neem Cake Powder (Neem Khali) and one tablespoon of Bone Meal into your pot. Neem khali protects the delicate root system from soil-borne fungus and nematodes, while bone meal delivers slow-release phosphorus for explosive flowering later on.
Step-by-Step Germination Guide: From Seed to Sapling
Now that your container and soil are ready, let’s get those seeds sprouting!
[Seed Sowing] ---> [Germination: 7-14 Days] ---> [Transplanting: 4 Leaves] ---> [First Harvest: 70-80 Days]
Step 1: The Nursery Stage
Do not sow your seeds directly into the large 12-inch pot. Chillies prefer being raised in a small “nursery” environment first. Use a seedling tray, small disposable paper cups, or small small clay bowls. Fill them with a light mixture of 50% cocopeat and 50% vermicompost.
Step 2: Sowing the Seeds
Place 2 seeds per cup, about a quarter-inch deep into the mix. Cover them gently with a light dusting of cocopeat. Mist the surface with water using a spray bottle—do not pour water directly, or the tiny seeds will wash away.
Step 3: The Waiting Game
Keep the tray in a warm, shaded area. In Indian weather, chili seeds typically germinate within 7 to 14 days. Once you see tiny green shoots breaking through the surface, immediately move the tray to a spot that receives bright, indirect sunlight.
Step 4: Transplanting to the Main Pot
When your young saplings grow to about 4 to 5 inches tall and develop 4 to 6 true leaves, they are strong enough to move. Gently ease the sapling out of its starter cup, taking care not to disturb the root ball, and plant it right into the center of your prepared 12-inch pot. Water it thoroughly and keep it in partial shade for 2 days to recover from transplant shock before moving it to full sun.
Sunlight and Watering Rules: Navigating Indian Seasons
Managing weather is the trickiest part of understanding how to grow chillies in pots at home in India. Our microclimates fluctuate drastically between blistering dry heat and intense monsoon downpours.
Mastering the Summer Sun
Chili plants are sun worshippers. They need at least 6 hours of direct sunlight daily to trigger flower production. However, peak Indian summer afternoons (April to June) can easily cross $40^\circ\text{C}$.
- The Fix: If you notice your plant’s leaves drooping significantly or turning a pale yellow in May, move the pot to a spot where it gets bright morning sun but is shielded from the blistering 1 PM to 4 PM afternoon heat. Alternatively, setup a basic green agro-net over your balcony.
Smart Watering vs. Monsoon Drainage
More chili plants die in India from over-watering than under-watering. Chillies hate “wet feet” (roots sitting in stagnant water).
- The Finger Test: Never water on a fixed schedule. Stick your index finger an inch into the potting mix. If it feels completely dry, water the plant deeply until you see water dripping out of the bottom drainage holes. If it feels damp, step away!
- The Flowering Rule: When your plant starts producing small white flowers, reduce watering slightly. Allowing the soil to dry out just a tiny bit stresses the plant into thinking it needs to reproduce, resulting in more flowers and hotter chillies. Overwatering at this stage causes the flowers to drop off completely.
- Monsoon Management: During heavy rains, ensure your pots are not sitting in water saucers. Clear out any debris blocking the drainage holes so the heavy rain flows right through.
Troubleshooting Common Chili Plant Diseases
Even with the best care, your chili plant will occasionally face issues. Let’s look at the two biggest roadblocks home gardeners face in India and how to tackle them organically.
1. The Dreaded Leaf Curl Virus
If you notice the leaves of your chili plant puckering, wrinkling, twisting upward, and turning into tiny “cups,” your plant is suffering from Chili Leaf Curl. This is usually caused by tiny, invisible sap-sucking pests like thrips, aphids, or whiteflies that transmit a virus to the plant.
- Organic Solution: Mix 5 ml of pure organic Neem Oil with 2-3 drops of regular liquid dishwashing soap in 1 liter of warm water. Shake it vigorously until it turns into a milky emulsion. Spray this thoroughly all over the plant, especially on the undersides of the leaves, once every week in the late evening.
- Severe Cases: If a single plant is completely deformed and stunted, isolate it from your other plants immediately and prune away the worst-affected branches to stop the spread.
2. Why Are My Chili Flowers Dropping Off?
It can be incredibly heartbreaking to see your plant covered in beautiful white blossoms, only for them to drop off onto the soil without turning into chillies. This common issue is usually caused by:
- Extreme Temperatures: High heat waves above $40^\circ\text{C}$ sterilize the pollen.
- Improper Watering: Switching erratically between bone-dry soil and muddy, waterlogged soil.
- Lack of Pollination: If your balcony has no wind or visiting bees, the flowers won’t pollinate. Give the plant stem a very gentle shake every morning to help self-pollination.
The Reward: Harvesting Your Homegrown Green Chillies
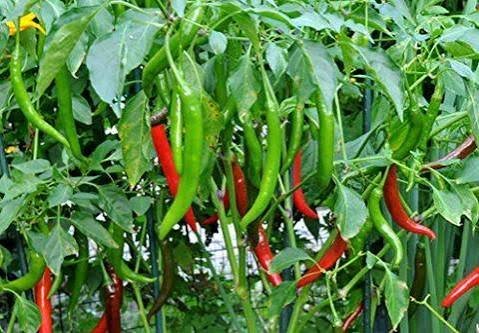
After roughly 70 to 80 days from transplanting, your patience will pay off. You will see long, glossy, deep green chillies hanging proudly from the branches.
When harvesting, do not yank the chili off the plant, as this can snap the delicate branches. Use a sharp pair of scissors or garden shears to snip the stem cleanly. If you prefer a milder spice with a crisp bite, harvest them while they are bright green. If you leave them on the vine longer, they will slowly turn a brilliant red—increasing dramatically in heat and turning sweeter!
Now that you know exactly how to grow chillies in pots at home in India, there is no reason to rely on chemical-sprayed, stale market produce. Pick up a pot, mix your soil, plant those seeds, and get ready to elevate your home cooking with the freshest, spiciest hari mirch you have ever tasted!
See Also
How to grow Chillies at home in containers|| Complete guide with harvesting||Backyard Gardening
7 Easiest Vegetables to Grow in Balcony India: The Ultimate Urban Apartment Guide